

Email Accounts
URL: /client/email-accounts-page
Manage your email accounts easily. Create, view, and organize all your email addresses in one place.
Overview
The Email Accounts interface provides centralized management for all email addresses on your account. Create new accounts, configure settings, and monitor usage from a single dashboard.
Internationalised domains
Mailboxes on a domain with a non-ASCII name work the same as any other. The domain dropdown and the Account @ Domain column show the readable Unicode form, while the mail server stores and routes the address using the Punycode form. See Internationalised domain names.
For detailed documentation, visit docs.adminbolt.com.
Create Email Account
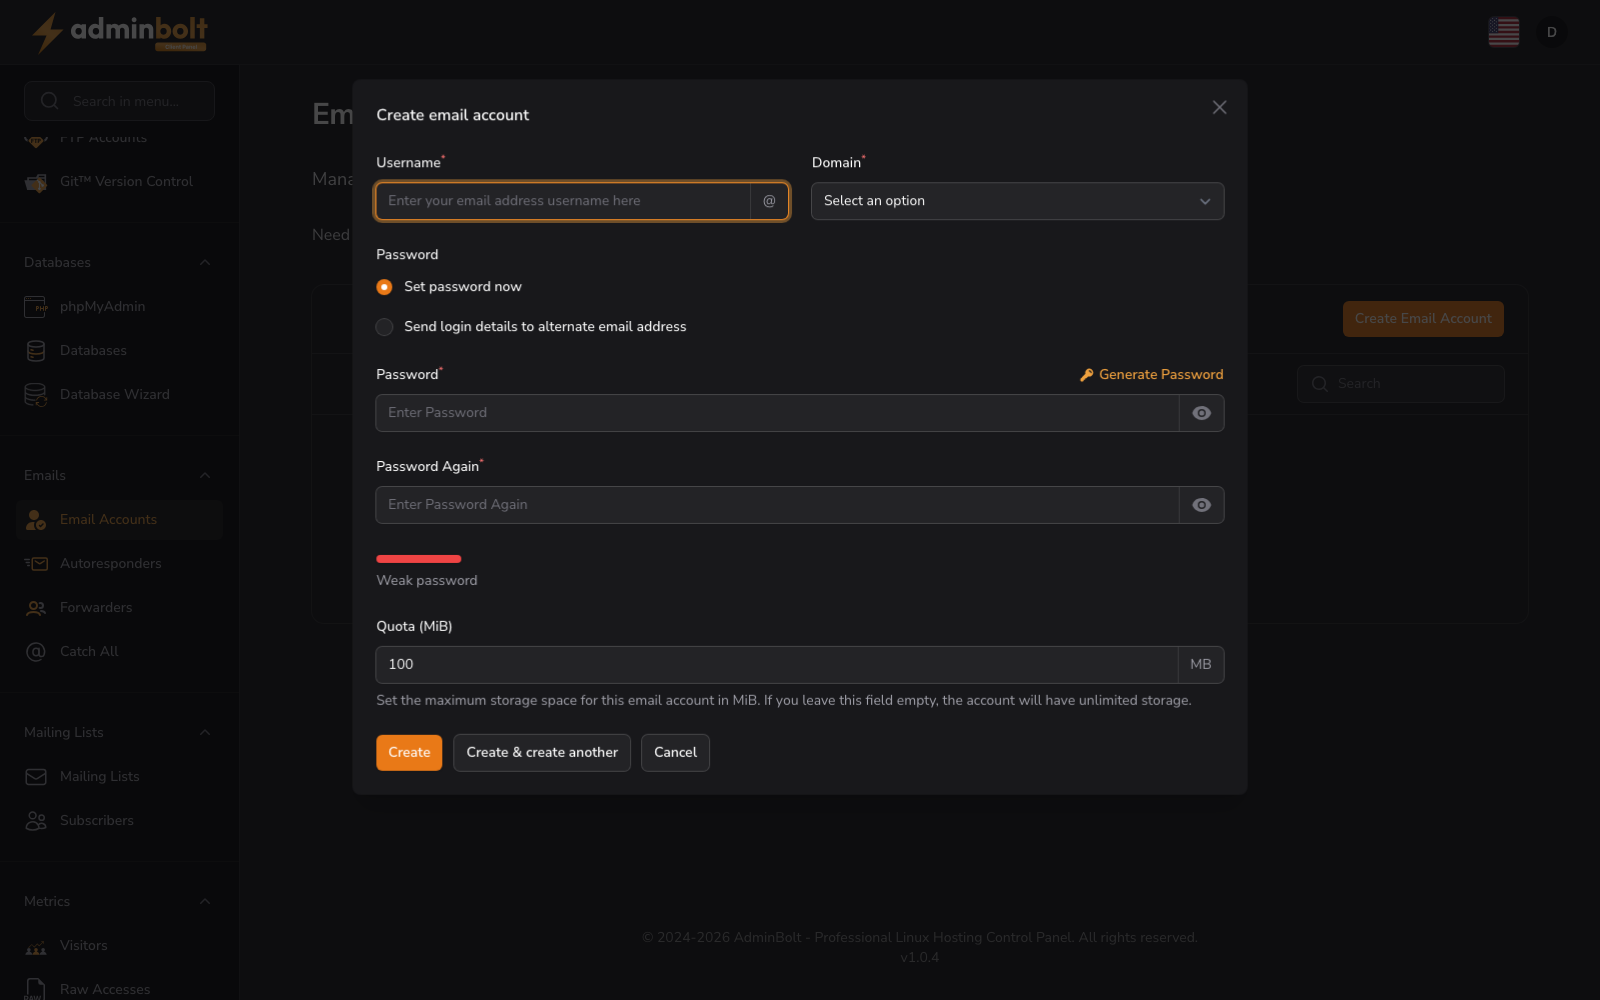
Click the "Create Email Account" button to add a new email address to your account. The form includes the following fields:
Create email account
- Username (text, required) - The local part of the email address (the part before the @ symbol)
- Domain (dropdown, required) - Select which domain this email account will use
- Password - Choose how to set your password:
- Select "Set now" to create a password immediately
- Password (password, required) - Enter your desired password
- Confirm Password (password, required) - Re-enter your password to confirm
- Password Strength - Visual indicator showing your password strength
- Select "Send to email" to have a secure link sent to your email
- Select "Set now" to create a password immediately
- Quota (number) - Set the maximum mailbox size in MiB (mebibytes). Leave blank for unlimited storage.
Form buttons: Create, Cancel
Find Accounts
Use the search bar to quickly locate email accounts by searching for account names or associated domains.
Account Management
When email accounts exist, the table displays:
- Account @ Domain: The full email address.
- Restrictions: Any sending or access limitations. A mailbox that actually carries a restricting state is shown as Restricted; a mailbox with no restrictions is shown as Unrestricted.
- Usage: Current mailbox usage.
- Quota: Maximum mailbox size allowed.
- Import: The status of an IMAP import for this mailbox (see Import a mailbox from another provider).
- Actions: Login to Webmail, Edit, Connect Devices, and Import Mailbox.
Empty State
If you have no email accounts, the interface displays "No Email Accounts" with a message "Create an email account to get started."
Account Actions
Each email account has the following options:
- Login to Webmail: Access webmail directly from the panel.
- Edit: Modify account settings and configuration.
- Connect Devices: Configure email access on external devices. When you set up a mail client, the incoming and outgoing mail server address is
mail.<your-domain>if the domain's mail certificate is active; otherwise, use the server hostname shown in the connection details. - Import Mailbox: Copy messages from a mailbox at another provider into this account over IMAP (see Import a mailbox from another provider).
Import a mailbox from another provider (IMAP)
Use Import Mailbox next to an account to copy its messages from a mailbox hosted at another provider over IMAP. This is useful when you move an address to AdminBolt and want to bring across the existing mail.
Selecting Import Mailbox opens the "Import mail into ..." dialog, where the title includes the target mailbox address. Complete the connection details for the source mailbox:
- Source IMAP server (required) - The hostname or IPv4 address of the provider's IMAP server, for example
imap.example.com. - Port (required) - The IMAP port on the source server. It defaults to
993and accepts a value from 1 to 65535. - Encryption (required) - How the connection to the source server is secured:
- SSL/TLS (usually port 993)
- STARTTLS (usually port 143)
- None
- Source username (required) - The login for the source mailbox, usually the full email address.
- Source password (required) - The password for the source mailbox.
Test the connection
Select Test connection to verify the details before you start. The panel reports one of the following results:
- Connection successful - the details are valid and the import can start.
- Connection failed - the source server rejected the connection or the credentials.
- Missing connection details - one or more required fields are empty.
- Invalid source server address - the server value is not a valid hostname or IPv4 address.
Start the import
Select Start Import to queue the transfer. The import runs on the server, not in your browser, so you can close the dialog and leave the page while it works.
The Import column on the account list reports progress and refreshes every 10 seconds while an import is running:
- Import queued - the import is waiting to start.
- Importing X/Y - messages are being copied, where X is the number processed and Y is the total.
- Imported (N) - the import finished and copied N messages.
- Import failed - the import did not complete. Hover over the status to read the error in a tooltip.
Imports are safe to re-run. Existing messages are kept, and running the import again only pulls in new messages from the source mailbox.
Note: You can run one active import per mailbox and up to three active imports per hosting account at a time. The source password is used only for the transfer and is removed once the import completes.
Getting Started
Create your first email account by clicking the "Create Email Account" button and following the provided wizard.